This post may contain affiliate links, including those from Amazon Associates. If you make a purchase through these links, I may earn a commission at no additional cost to you. Learn more about our affiliate policy.
There’s something enchanting about a market table glowing with handmade magic. Little jars filled with herbs, crystals catching the light, candles flickering beside bundles of fragrant plants.
If you’ve ever dreamed of selling your creations at a witchy or magical market but felt overwhelmed by what to make or how to start, this is your guide.
You want your table to feel beautiful and authentic, but you also need your crafts to be practical, affordable, and doable with the time and materials you have.
The good news is, your magic doesn’t have to be complicated. These twelve ideas are beginner-friendly, budget-conscious, and full of charm.
Best Witchy Crafts To Start With First
If you want the quickest path to a beautiful, market-ready table, start with the crafts that are easiest to batch, simplest to explain, and most giftable at first glance.
- Best for beginners: spell jar kits, rune or sigil stones, herbal tea or potion bags
- Best for impulse buys: mini intention candles, resin moon keychains, pressed flower resin charms
- Best for higher perceived value: crystal wire-wrapped pendants, home blessing kits, moon phase wall hangings
- Best for earthy, rustic displays: herbal smudge stick bundles, mini besom brooms, moon phase wall hangings
If you are feeling overwhelmed, choose one low-cost item, one giftable item, and one display piece. That mix makes your table feel fuller without overcomplicating your prep.

The Real Value Of Witchy Crafts
Witchy crafts are more than aesthetic. They carry energy, story, and intention. A simple object becomes magical when it’s made with awareness and care.
Remember, you’re not just selling a product, you’re offering a piece of ritual, a moment of connection.
Your buyers aren’t looking for perfection. They’re drawn to authenticity. Slightly rustic edges, natural textures, and handwritten tags all create warmth. Witchy crafts celebrate the handmade and the imperfect.
You also don’t need expensive supplies. Start with natural and affordable materials and add small magical touches like paint, crystals or symbolic charms.
Meaning adds value, and your customers will feel it.
Which Witchy Crafts Usually Sell Fastest?
At magical markets, the fastest-selling items are often the ones that feel meaningful, affordable, and easy to gift. Small ritual tools, pocket-sized items, and anything with a clear intention tend to do especially well because customers can understand them instantly.
Look first at:
- spell jar kits
- mini intention candles
- rune or sigil stones
- herbal tea or potion bags
- crystal pendants
These types of products are easier for customers to say yes to on the spot, especially when they are clearly labeled and priced as simple gifts, altar additions, or personal ritual tools.
Now let’s look at the crafts themselves, starting with some of the easiest and most affordable options to batch for magical markets.
Spell Jar Kits

Small jars filled with herbs, salt, and crystals are always a market favorite. They’re easy to make, beautiful to display, and endlessly customizable.
What You’ll Need
- Small glass jars with corks or lids
- Dried herbs such as lavender, rosemary, or rose petals
- Coarse or sea salt
- Crystal chips
- Twine or ribbon
- Small tags for labeling
How to Make Them
Add a layer of salt to the jar, then a pinch of herbs and crystal chips. Choose a theme like protection, abundance, or love. Close the jar and wrap twine around the neck, tying on a tag with its intention.
Batch Tip For Spell Jar Kits
Spell jars are easiest to make when you batch them in layers. Set out all your jars first, add salt to every jar at once, then move through your herbs, crystals, twine, and tags step by step.
This keeps the process calm, saves time, and helps your finished jars look more consistent on the table.

Find 15 more affordable spell jar recipes that sell well here.
Herbal Smudge Stick Bundles

Bundles of dried herbs not only look gorgeous, they also smell incredible. You can use rosemary, lavender, or sage (ethically sourced or home-grown alternatives).
What You’ll Need
- Fresh or dried herbs (rosemary, lavender, sage, or cedar)
- Cotton twine
- Scissors
- Dried flowers for color (optional)
How to Make Them
Gather herbs into a small bundle, keeping stems even. Wrap tightly with cotton twine from base to tip, looping several times before tying off. Learn more about how to dry herbs and flowers here.
Tuck a dried flower or tiny crystal into the bundle if you like. Hang upside down for about a week to dry.
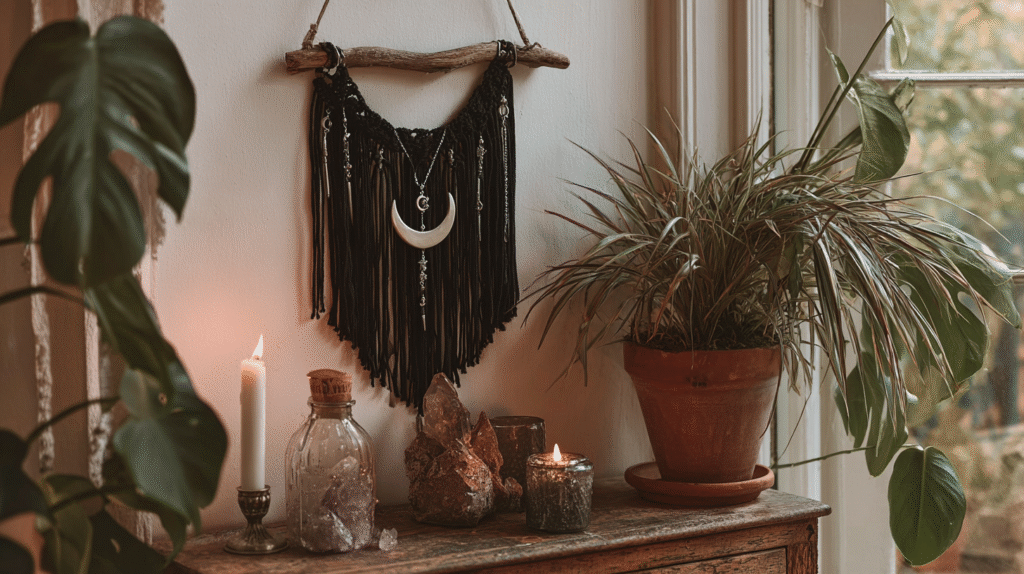
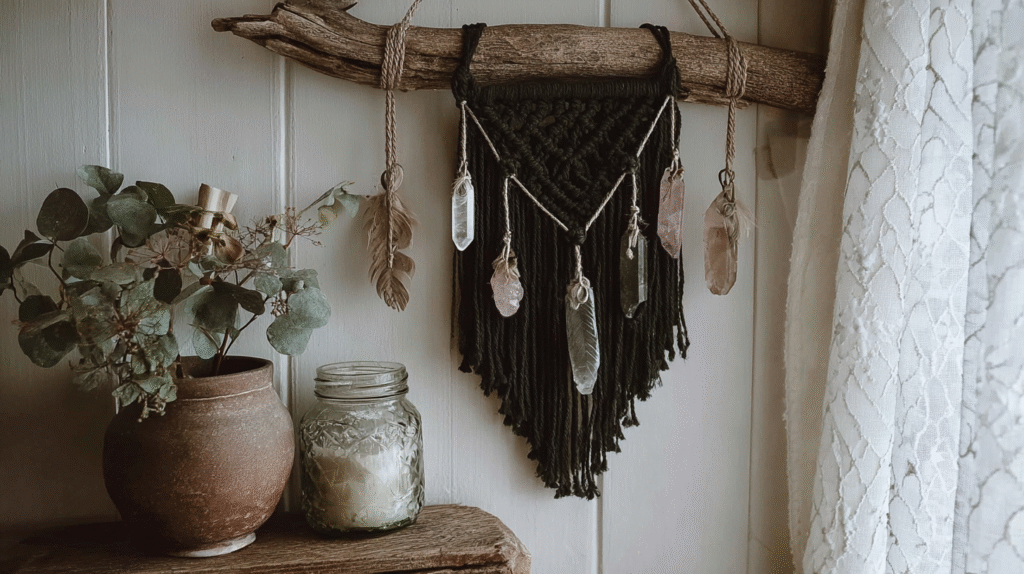
Rustic Moon Phase Wall Hangings

Rustic moon phase wall hangings are always a hit at magical markets. They’re simple to paint, look beautiful on nearly any display wall, and can be made in countless styles using basic wood slices, twine, and a few shades of black, white, and gray.
You can string them vertically, tie them to a branch for a horizontal design, or create a looser, gathered style for a more natural look.
There’s no single way to assemble them, which makes this craft ideal for experimenting with different textures, layouts, and add-ons like beads or dried herbs.
If you want a deeper walkthrough with examples of different layouts and hanging styles, you can follow the full tutorial on rustic wood slice moon phase wall hangings here.

Mini Intention Candles
Candles with crystals, herbs or flower petals embedded in them always draw attention at markets. They’re inviting, warm, and easy to price for impulse buys.
What You’ll Need
- Soy or beeswax flakes
- Small tins or amber glass jars
- Essential oils
- Dried herbs or petals
- Candle wicks
How to Make Them
Melt wax in a double boiler, then add a few drops of essential oil once fully liquid. Place a wick in the center of each container and pour in the wax. Before it sets, sprinkle a pinch of herbs or petals on top.
Label each candle with its theme such as Moonlight Calm or Hearth Protection and let them cure overnight.
Display Idea For Candles, Jars, And Small Ritual Goods
Small items sell better when they are grouped by mood or intention. Try creating tiny collections such as:
- Moon and rest
- Love and softness
- Protection and grounding
- Abundance and new beginnings
When similar items are displayed together, customers understand your table more quickly and often buy more than one piece.
If you enjoy making ritual-style pieces for the home, you may also love these witchy pressed flower wall art ideas for adding more handmade beauty to your booth or backdrop.

Here is a tutorial for making these from beginning to end:
Tarot or Oracle Card Bags

Soft fabric pouches make thoughtful gifts and useful storage for cards, runes, or crystals. They’re quick to sew and can be made from recycled or thrifted materials.
What You’ll Need
- Cotton or linen fabric with mystical designs
- Scissors
- Sewing machine or needle and thread
- Ribbon or cord for drawstring
How to Make Them
Cut two rectangles of fabric and sew three sides together, leaving the top open.
Fold the top edge over to create a casing and thread a ribbon or cord through it. Choose fabrics with celestial or botanical patterns.
Add a charm or embroidered star near the opening for a personal touch.

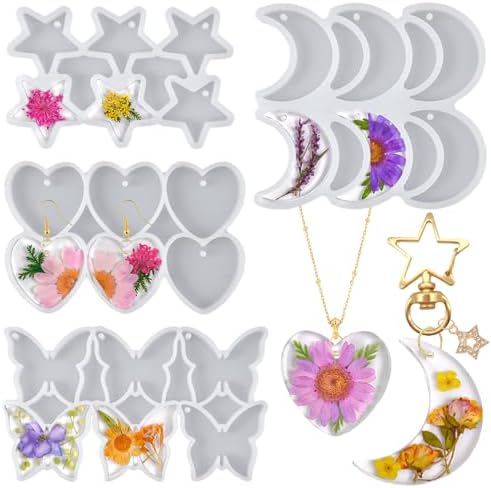
Pressed Flower Resin Charms

These delicate pieces combine nature and art beautifully. While resin crafting takes a little setup, it’s perfect for small items like pendants, keychains, or talismans.
What You’ll Need
- Clear epoxy resin and hardener
- Small pendant casting molds
- Pressed flowers or herbs
- Toothpicks or tweezers
- Jump rings and pliers
How to Make Them
Mix the resin and pour a thin layer into each mold. Arrange pressed flowers or herbs on top, then cover with more resin.
Use a toothpick to release bubbles.
After curing, remove from molds and sand any rough edges. Add chains or jumprings for keychains or pendants.
If you love the idea of blending natural materials and display-worthy pieces, you might also enjoy 8 Beautiful Ways to Display Dried Flowers as Wall Hangings, which shares styling and presentation techniques that elevate handcrafted offerings.
Crystal Wire-Wrapped Pendants

Few things are as satisfying as turning a raw crystal into wearable art. These pieces sell beautifully because they carry both beauty and intention.
What You’ll Need
- Small crystals or tumbled stones
- Silver or copper jewelry wire
- Jewelry pliers
- Necklace cords or chains
How to Make Them
Cut a length of wire and wrap it securely around the crystal, leaving a loop at the top for hanging. Twist and shape until the stone feels snug. Thread a cord through the loop. Display with cards describing the energy of each stone—amethyst for intuition, rose quartz for love, or smoky quartz for grounding.
If you are new to wire wrapping, this beginner-friendly video tutorial shows three simple ways to wrap crystals for pendants:
Mini Besom Brooms

A miniature broom symbolizes cleansing and new beginnings, making it a beautiful handcrafted piece for witchy homes.
What You’ll Need
- Small sticks or twigs
- Straw bristles bundle or dried herbs
- Twine or natural string
- Ribbons or charms (optional)
How to Make Them
Bundle herbs or straw around one end of the stick and wrap tightly with twine. Trim the bristles evenly and decorate with ribbon or a small charm. Hang them on walls or sell them as altar brooms and threshold blessings.
Here is a quick tutorial on how to make these brooms:
If you want more handmade pieces that fit this earthy, magical style, browse these enchanting DIY nature crafts for witchy boho decor for ideas you can adapt into future products or seasonal collections.
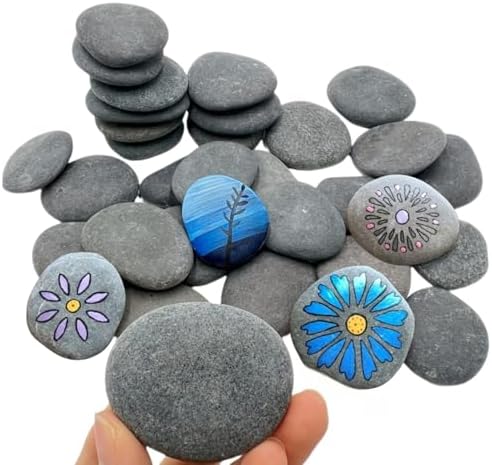
Rune or Sigil Stones

Painted stones are simple yet powerful. Each one carries meaning and sells well because of its small size and approachable price.
What You’ll Need
- Smooth pebbles or wooden discs
- Acrylic paint or paint pens
- Clear sealant spray
How to Make Them
Paint runes, symbols, or sigils on each stone and let them dry. Coat with a light layer of sealant to protect the design. Package in small pouches with a printed rune guide. Their size makes them easy to produce and restock between markets.
Herbal Tea or Potion Bags

If you love blending herbs, this craft combines beauty with wellness. Create small muslin bags of caffeine-free herbal tea mixes labeled for intention like Dream Witch (lavender and chamomile) or Morning Clarity (mint and lemon balm).
What You’ll Need
- Small reusable muslin tea bags
- Dried herbs like chamomile, mint, rose, or lemon balm
- Mixing bowl and spoon
- Tags and string
How to Make Them
Mix herbs according to the mood you want to evoke: Dream Rest with chamomile and lavender, or Morning Clarity with mint and lemon balm. Spoon the blend into each tea bag and tie shut.
Label with ingredients and steeping directions.
Place baskets of them on your table for customers to smell.

Resin Moon Keychains

Tiny moon-shaped keychains add a whimsical touch to your display. Use resin molds in crescent shapes, tint them with pigment, and sprinkle in gold flakes or mica powder.
What You’ll Need
- Crescent moon and star jewelry resin casting molds
- Epoxy resin
- Gold flakes or mica powder
- Keychain rings and jump rings
How to Make Them
Mix resin and tint with mica or pigment powder. Pour into molds and sprinkle gold flakes before curing.
Once hardened, attach a jump ring and keychain ring. These are quick to make and easy to sell in sets or as add-ons.
Home Blessing Kits

Bundle a few small items into a single kit to increase perceived value. Each kit can include a mini salt pouch, a small herb bundle, and a candle or incense cone.
What You’ll Need
- Small kraft boxes or linen bags
- Mini candle or incense cone
- Herb bundle or salt pouch
- Small crystal or charm
- Printed ritual card
How to Make Them
Layer the items neatly in each box with tissue or dried moss.
Include a short ritual card: light the candle, sprinkle salt near the doorway, and set your intention for peace.
These make lovely housewarming or seasonal gifts.
What Makes A Witchy Craft Sell Well At Markets?
The most successful market crafts usually share a few qualities. They catch the eye quickly, feel meaningful without needing a long explanation, and fit naturally into a customer’s home, altar, gift basket, or daily rituals.
Items also tend to sell more easily when they are:
- lightweight and easy to carry
- clearly labeled with a purpose or intention
- priced simply and confidently
- displayed in small themed collections
- easy to restock between events
When in doubt, choose crafts that are beautiful, useful, and easy to explain in one breath.
Packaging, Pricing, and Presentation
A Simple Pricing Formula
If pricing feels difficult, start with this simple formula:
materials cost + packaging cost + your time + profit margin = selling price
For lower-cost items, it can also help to think in tiers:
- small impulse buys
- mid-range gifts
- statement pieces
That way, your table feels accessible while still giving room for higher-value sales.
The way you present your crafts matters almost as much as the crafts themselves. Simple materials like kraft paper, jute, wax seals, or recycled fabric fit the aesthetic beautifully and cost very little. Natural packaging aligns with your brand’s story of connection to the earth.
Tip: Create story tags for each item describing its symbolism or use. People love to feel connected to the meaning behind what they buy. A simple handwritten note can turn curiosity into a sale.
Keep one or two items lit by candlelight or soft fairy lights to draw the eye. Invite conversation, it’s your story that sells your craft.
Market Day Packing Checklist
Before you leave for your event, make sure you have:
- enough product labels and price tags
- backup packaging for sold items
- a small mirror or riser to add display height
- business cards or shop cards
- a table covering that matches your aesthetic
- cash change and a card payment option
- extra twine, tape, scissors, and tags for quick fixes
A little preparation makes your booth feel more polished and makes the day easier for you.
Common Mistakes To Avoid
When you are first selling at markets, a few small choices can make your table feel harder to shop.
Try to avoid:
- bringing too many one-off items and not enough repeatable pieces
- using labels that are vague or hard to read
- pricing only for materials and forgetting your time
- making everything the same size or same price
- overcrowding your display so nothing stands out
A little structure makes your work easier for customers to understand and easier for you to sell.
Closing Reflection
Selling at magical markets is more than a business venture; it’s an act of connection. You’re offering pieces of your own craft and creativity to others who seek meaning, beauty, and grounding.
Start with what feels simple and joyful. Let your process be intuitive and slow. Over time, your market table will become an extension of your energy, a small altar to creativity, abundance, and self-trust.
Your crafts don’t need to be elaborate to be powerful. They just need your hands, your heart, and a touch of magic.