This post may contain affiliate links, including those from Amazon Associates. If you make a purchase through these links, I may earn a commission at no additional cost to you. Learn more about our affiliate policy.
Air dry clay is the simplest way to make your own celestial decor from scratch. There is no kiln, no wheel, and no firing involved, just a block of clay from the craft store, a rolling pin, and a couple of days of drying time. With that, you can shape moon phase dishes, constellation wall hangings, star garlands, and a sculpted sun face for your own walls and shelves.
There’s an old, quiet magic in molding your own moon, your own scattered stars, from nothing more than water and earth.
Whimsigoth spaces were never meant to look purchased. They were meant to look gathered, layered, remembered.
Air dry clay is one of the gentlest ways back into that feeling, no kiln, no fuss, just your hands and a little patience.
Why Air Dry Clay Works for Whimsigoth Decor
Whimsigoth borrows heavily from the 1990s: dark florals, celestial motifs, velvet and tarnished metal, fringed lamps and secondhand furniture. The look depends on layering, and on objects that seem collected over years rather than ordered all at once.
Air dry clay fits that brief better than almost any other craft material. It cures to a chalky, slightly uneven matte surface that reads as old stone or unglazed pottery, and it takes acrylic paint, washes, and metallic pigment well, so a piece you made on Sunday can be antiqued to look like an estate sale find.
This is one of the most forgiving whimsigoth decor craft projects to start with, since one block of clay covers nearly everything below.

Start With Air Dry Clay
Every project here uses the same base material: a block of air dry clay, white or terracotta, from any craft store. One two pound block is enough for several of these projects. Each section below lists the extra supplies for that specific piece.
If you have never worked with it before, a few things are worth knowing:
- It dries by evaporation, not heat. No kiln, no oven, just air. Most flat pieces take 24 to 48 hours, and thick or sculpted pieces need two to three days.
- Knead it first. A minute of working the clay in your hands warms it, evens out the moisture, and cuts down on cracking later.
- Water is your glue. To join two pieces, scratch both surfaces with a toothpick, brush on a little water, and press them together firmly. Pieces stuck on dry will pop off.
- Work on parchment paper. Clay grips bare tables and warps when you pry it up. Parchment lets you move a piece without distorting it.
- Roll to about a quarter inch. Thinner pieces crack, thicker ones take days longer to dry. Flip flat pieces after the first day so they dry evenly and do not curl.
- Cracks are fixable. Mix a pinch of clay with water into a thick paste, work it into the crack, smooth it, and let it dry again.
- It is not waterproof. Acrylic paint and a matte sealer are what protect a finished piece, so seal anything that will be handled, hung outdoors, or set near water.
- Wrap leftovers tightly. Plastic wrap plus a zip bag keeps an open block usable for weeks.
Moon Phase Trinket Dish
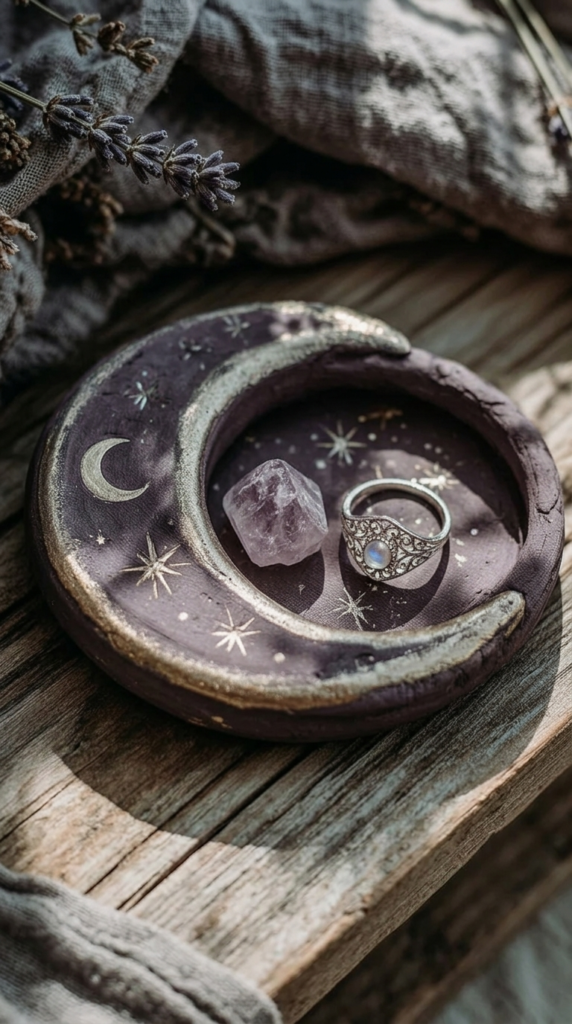
A crescent-and-circle dish is the kind of small useful object a whimsigoth room is built from. Keep it on a nightstand, dresser, or altar for rings, raw crystals, and treasures at the end of the day.
You will also need:
- Rolling pin or a straight sided glass bottle
- A small bowl about four to five inches across, to shape the dish over
- Butter knife or craft knife, and a toothpick
- Parchment paper and a small dish of water
- Acrylic paint in deep plum or aubergine, plus white and metallic gold paint pens
- Matte sealer
Instructions:
- Roll and cut two slabs about a quarter inch thick on parchment in five inch circles, using the rim of your small bowl as a template. Place one aside.
- Curve the edge of the first circle into a shallow saucer, then smooth the rim between damp fingers.
- Cut away the crescent moon from the inside only of the second circle. Carve out star and moon shapes with the toothpick to paint later.
- Add some water with your fingertips around the rim of the dish, then place the moon shape on top, smoothing and pressing them together.
- Allow to dry, then paint a base color, then use a paint pen to highlight the stars and moon shapes.
- Seal with matte varnish once the paint is fully dry.
Scattered Constellation Wall Art
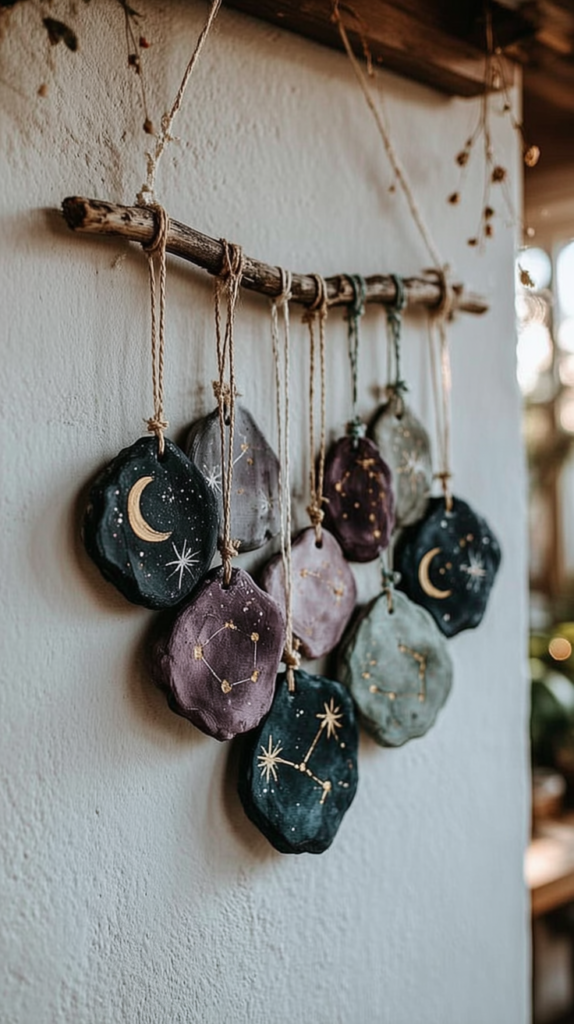
A found branch strung with painted clay shards hits the exact whimsigoth note: celestial, slightly witchy, and clearly gathered rather than bought. It is closer in spirit to whimsigoth than anything boxed on a shelf, and it fills a bare stretch of wall above a bed, desk, or mantel.
You will also need:
- A fallen branch or stick, roughly 12 to 16 inches long
- Rolling pin, craft knife, and a bamboo skewer
- Natural twine or waxed cord
- Fine sandpaper
- Acrylic paint in navy, plum, sage, and charcoal, plus white and metallic gold
- A fine liner brush
- Matte sealer
Instructions:
- Roll a slab a scant quarter inch thick and cut seven to nine irregular shapes with mostly straight edges, like flat stones or pieces of broken slate. Vary the sizes.
- Poke a hole near the top of each piece with the skewer, slightly wider than you think you need, since the clay tightens as it dries.
- Dry the shapes flat for 24 to 48 hours, flipping them after the first day so they stay flat. Sand the edges lightly.
- Paint each piece one of your muted colors, mixing the palette across the set and letting the brush marks show.
- Paint constellations, stars and moons in gold, silver or white details once the base coats are dry
- Flick on a few white specks for background stars.
- Seal everything with matte varnish.
- Cut lengths of twine at different lengths, thread one through each piece, and tie them along the branch so they hang staggered rather than level.
- Knot a longer piece of twine to both ends of the branch for hanging.
If these projects are lighting you up, you will likely be inspired by these celestial decor projects from Tina Le. She creates an incense holder similar to the moon trinket dish and demonstrates some constellation and starry sky painting techniques that work welll for these projects:
Sculpted Sun Face Wall Hanging
A weathered sun face balances out all the moons and shadows elsewhere in the room and gives the 70s revival side of whimsigoth something to hold onto. Hang it in an entryway or above a shelf where raking light can pick up the carved texture.
You will also need:
- Rolling pin, craft knife, and parchment paper
- Two large circular items like bowls of different sizes, or a compass
- A clay modeling tool, or the rounded back of a small spoon
- A bowl of water and a toothpick for scoring
- Acrylic paint in color of your choice
- A soft rag or paper towel
- Matte sealer and a length of jute rope
Instructions:
- Roll a slab about a third of an inch thick, cut a large circle for the face and rays
- Score a smaller circle inside for the sun’s face using a compass or smaller bowl/jar
- Score and cut away long narrow triangles for the rays.
- Build the face with small additions of clay: a wedge for the nose, two soft mounds for the cheeks, a curved shape for the lips. Blend every edge into the base with a damp fingertip so nothing looks stuck on.
- Press and score any fine lines of the face
- Score a center line down each ray for texture.
- Press a hole through a thickened tab at the top with a toothpick
- Dry flat for two to three days. Sculpted pieces this thick hold moisture in the middle long after the surface feels dry.
- Sand the rough spots, then paint the whole sun with acrylic paint.
- Seal with matte varnish and hang from a loop of jute rope.
Here is a tutorial from Allie Rose for this project:
@allierose_7 Let’s make an air dry clay sun✨🎨 #airdryclay #sunart #gardendecor #claydiy #claydiyideas #celestial #airdryclaysun #airsryclayart #clayideas
♬ som original – 𝑷𝒆𝒅𝒓𝒂𝒅𝒂𝒔🎵New from Wild Enchantment
Whimsigoth Styling For Every Room In Your Home
A room by room guide to grown-up whimsigoth styling, thrift finds and budget buys included.
Moon Taper Candle Holders
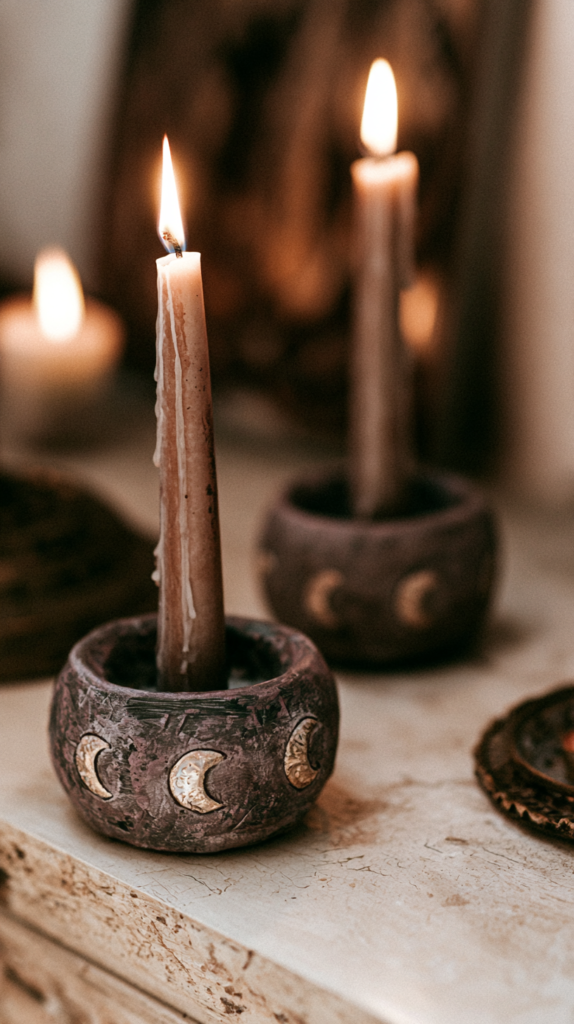
Squat hand pinched holders ringed with gilded moon phases read as ritual objects rather than decor, which is the whole appeal. They sit naturally among your spiritual altar ideas for every season, or in a pair on a mantel or dinner table.
You will also need:
- Taper candles, to size the openings
- A bowl of water and a butter knife or clay tool
- Fine sandpaper
- Acrylic paint in dark brown or aubergine, plus metallic silver paint or paint pen
- A small round brush
- Matte sealer
- Aluminum foil or small metal candle cup inserts, for safety
Instructions:
- Roll a ball of clay about the size of a plum, then press the bottom flat on the table so it sits level.
- Push your thumb into the top to open a well, and pinch the walls up and outward until you have a thick walled little pot.
- Press the base of a taper candle straight down into the center to size the opening, wiggling it slightly wider than the candle, then pull it out before the clay firms up.
- Smooth the outside with damp fingers but leave some of the hand formed unevenness in place.
- Score or carve out crescent moon shapes around the outside.
- Dry for two to three days.
- Sand the rim and base, then paint the whole holder dark brown or purple, working the color unevenly so it looks aged.
- Paint the moons around the outside with your metallic paint or paint pens.
- Seal with matte varnish.
Star Garland for a Window or Shelf
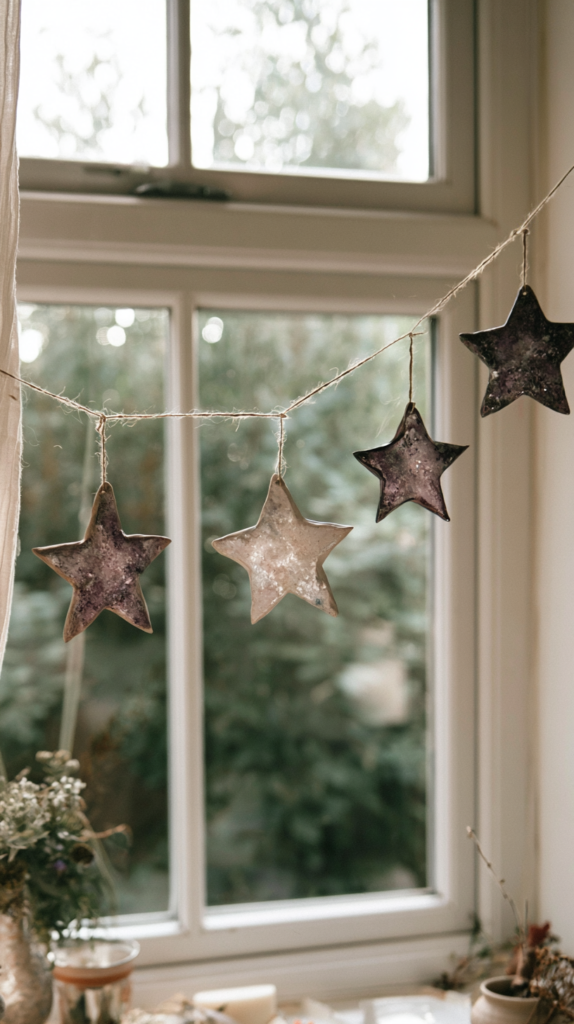
Speckled clay stars on a length of twine give a window that faded, dreamy 90s quality with very little effort, catching light the same way boho witchy crystal suncatchers do, only quieter. String it across a window, along a shelf edge, or above a doorway.
You will also need:
- Star cookie cutters in two or three sizes
- Rolling pin and a bamboo skewer
- Natural twine, about four to six feet plus extra for hanging loops
- Fine sandpaper
- Acrylic paint in various earthy yet mystical colors
- A stiff old toothbrush and white acrylic paint
- Matte sealer, and two small hooks for hanging
- Optional: Stamps, leaves or twigs to impress for more texture
Instructions:
- Roll a slab about a quarter inch thick and cut eight to ten stars, mixing the sizes.
- If you want more texture, impress stamps, twigs or leaves into the stars.
- Poke a hole through the top point of each star, set back about a quarter inch from the tip so it does not break through.
- Dry flat for 24 to 48 hours, flipping once, then sand the points and edges smooth.
- Paint the stars various colors, keeping the coverage a little uneven so the color looks worn.
- Dip the toothbrush in white paint and flick it across each star for a speckled, stone like finish, then seal with matte varnish.
- Cut a short piece of twine for each star, thread it through the hole, and knot it into a small loop.
- Tie the loops onto one long piece of twine at uneven spacing and slightly different drops, so the stars sit at varied heights.
- Hang the twine with a small hook at each end, letting it swag slightly rather than pulling it taut.
Here is a full tutorial for creating a star garland from start to finish:
Zodiac Constellation Pendant
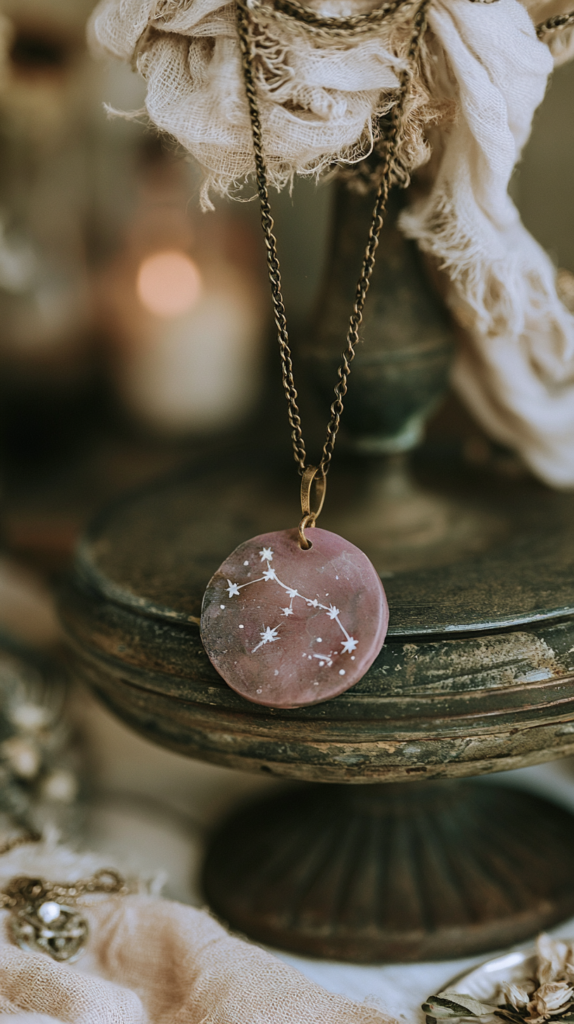
A disc mapped with your own constellation is whimsigoth you can wear, the same instinct as keeping a tarot card in your bag. Put it on a long chain, or hang it from a mirror or bedpost when you are not wearing it. You might as well make multiples and gift your friends with their zodiac constellation.
You will also need:
- Rolling pin and parchment paper
- A round cutter or bottle cap, about an inch and a quarter across
- A toothpick or straight pin
- Fine sandpaper
- Acrylic paint
- A fine liner brush or paint pen in white
- A gold jump ring and a chain or cord
- Matte or satin sealer
Instructions:
- Roll a small slab about an eighth of an inch thick.
- Cut a circle roughly the size of a quarter and smooth the cut edge with a damp fingertip.
- Punch a hole near the top with the toothpick and rotate the tip to widen it slightly, so it stays open for the jump ring.
- Look up your zodiac constellation and mark its stars with shallow pinpricks. These are your painting guide later.
- Dry for 24 hours, then sand both faces and the edge until smooth.
- Paint the front dusty rose in two thin coats rather than one thick one.
- Dot each star in white using the tip of a toothpick, then connect them with hairline strokes with liner brush or paint pen.
- Seal the pendant, thread the jump ring through the hole, and hang it on a chain.
Celestial Napkin Rings

Wide dark cuffs with a single raised metallic star make a table look considered without looking formal. Bring them out for dinners, seasonal gatherings, or a solstice table, and store them flat in a drawer between uses.
You will also need:
- Rolling pin, craft knife, and a ruler
- A cardboard tube such as a paper towel roll, wrapped in parchment
- A small star cutter
- A bowl of water and a toothpick for scoring
- Fine sandpaper
- Acrylic paint in deep navy or eggplant, plus pale silver or gold
- Matte sealer
Instructions:
- Roll a slab about a quarter inch thick and cut strips roughly one and a half inches wide by six inches long, one per napkin ring.
- Wrap a strip around the parchment covered tube, overlap the ends by about half an inch, and trim off any excess.
- Scratch both overlapping ends, brush them with water, and press them together firmly. Smooth the seam with a damp finger until it disappears.
- Cut a small star from a thin scrap of clay for each ring. Score the back, wet it, and press it onto the front of the band opposite the seam so it sits slightly raised off the surface. Smooth the edges of the star down to the ring carefully.
- Leave the rings on the tube for about twelve hours until they hold their shape, then slide them off and stand them on end to dry another 24 to 36 hours.
- Sand the edges, then paint the band deep navy or eggplant, brushing unevenly so the color looks aged and a little mottled.
- Paint the star with the metallic paint with a small brush, keeping the gold off the band around it so the shape stays crisp.
- Seal with matte varnish, and wipe rather than wash them after use.
Style Tips and Variations
Color does most of the work in tying these projects together. Pick three shades and use them across everything: one dark base, one muted mid tone, and one metallic. Deep aubergine, sage, and antique gold is reliable, and so is charcoal, dusty rose, and pewter.
Stirring a little of your dark base into the mid tone before you paint keeps the whole set looking related rather than randomly collected.
Two painting techniques are worth learning, because they are the difference between craft store finish and something that looks old.
For an aged wash, thin brown or black acrylic with water: brush it over a dry painted piece, and wipe most of it back with a rag before it sets, so color stays in the carved lines and low spots.
Dry brushing does the opposite: load a brush, wipe it nearly clean on a paper towel, then drag it lightly across raised edges so only the high points pick up gold.
The methods also swap between projects more easily than you might expect. The trinket dish technique makes a soap dish or a shallow bowl for loose incense, the constellation shards can hang from an embroidery hoop as a mobile instead of a branch, and the star garland works just as well with moon phases, in which case cut nine pieces and hang them in order.
From Wild Enchantment
Sell What Your Hands Create
The complete companion for turning your handmade crafts into real income at markets and online. What to make, what to charge, and where to sell it.
Get the Kit